 One of my little nieces recently celebrated her first birthday. Of course, I had to make some birthday goodness for her. In addition to the Mr. Pinklegs shirt, she ended up with a (fortunately) un-life-sized stuffed ladybug and some customized onesies.
The ladybug pattern is from Amy Butler's Little Stitches for Little Ones book, the Bed Bugs Large Ladybug. This is actually the second ladybug I have made; the first went to a different niece last Christmas. I chose to use the traditional red and black coloring, but, really, most any colors would work as long as the spots/body stripe/head/antenna are a solid (or near-solid) color.
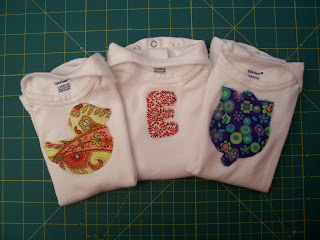
For the custom onesies, I used basic, plain white onesies. I found these at Target. I used some scraps of fabric for the appliques. The fabric for the "E" is actually some of the red fabric my sister and I used for this project, which was a gift for Little E's parents. Aww!

"How did I make the shapes?" you ask. I used cookie cutters. Thanks to one of my good friends, I received a set of 100 cookie cutters at one of my bridal showers back in the day. I love cookie cutters and making fun cookies and especially eating fun cookies. I don't do that enough, make fun cookies.
Anyhow, I found these three shapes among my cookie cutters I thought would be appropriate: a duck, a tulip, and an E. After tracing the "E" out, I snipped it up some to give it a little more definition since the cookie cutter makes a sort-of puffy "E." The duck and the tulip worked just fine as they were.
I used some fusible interfacing on the backs to help minimize fraying and then hand stitched them on. I did not use my Huskystar because I thought I might stretch the onesies out too much if I tried to maneuver them onto the machine. I used a basic back stitch, although it looks like a straight stitch, with two strands of embroidery floss for the thread.
Herzlichen Glückwunsch zum Geburtstag meiner kleinen Nichte!
Comments
--Beth